Tuesday, March 29, 2016

Class field trips


Blog 17
March 23, 2016
 
Field trips
Pearl Fryar Topiary Garden:
 Pearl Fryar moved to Bishopville in 1976.  The three acres that surround his home was flat and barren. In the early 80's, he began planting and pruning trees and shrubs. After two decades of  constant labor, he transformed his yard into an internationally-known topiary garden that attracts 5,000 visitors a year. The trees and shrubs are works of art. There are hand made sculptures through out the garden.
A Man Named Pearl – Documentary & Reviews
A feature-length documentary released across South Carolina in 2007, A Man Named Pearl is now taking national film festivals by storm.
 

Pearl Fryar is man who did not know the rules, so he didn't know what he was not suppose to do.  He tried and did things that no one had tried.  He pushed the limits, tied, failed and tried again, he had no real education in gardening, just desirer and wiliness to try and work.  This is fundamental to art and education.  Students should be able to experience the outcome of this and meet the man if still possible. 

 
Combining this trip with a sculpture lesson and elements & principle of Three Dimensional design.  Several ideas come to mind. 
-A school garden
-The sprite tree (pervious blog)
-recycle/found object sculpture (contact garden to see if students can place them at the Topiary garden)
-Have students brig sketch books and sketch drawings for  future paintings
-Photograph project.
     While researching field trips I found one website that would I feel would be helpful for a teacher or parent who was completely lost on the on the subject: classtrips.com
    It has categories for subject matters, states, fundraiser, and lesson plans.  They even break down in school activities and out of school activities.  This seems like a great tool. 
    I myself have not used it and need to do more research on the sight.  On first glance though, it seems like a good tool for information and ideas. 


Sculpture Bought Materials


Spirit Trees
Blog 16
March 21, 2016
Sculpture Bought Materials
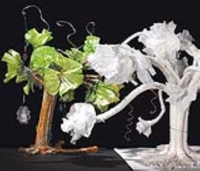
Spirit Tree Rope/Wirer Sculptures

History: Spirit Trees Legends are plentiful about connections between humans and trees — what will  your special tree reveal about you?
    
       Legends about trees have permeated cultures and theologies around the world since ancient times. The Tree of Life, the Tree of Wisdom or Knowledge, the World Tree, the Cosmic Tree — these are names for a symbolic or metaphorical tree that stories, ideas, and beliefs about life have been centered around. Nordic and Mesoamerican mythologies brought the concept that the world is supported on a strong tree that divides the realms of heaven, human existence, and the underworld. Native American legends regarding trees as caregivers and providers are abundant. The Cherokee call trees “The Standing People” and have a special fondness for cedar trees due to a legend in which the spirits of their ancestors were placed within a cedar. This "Spirit Tree" is created from lengths of coiling core, glued together and wrapped with wire to impart flexibility to the branches. It can be finished with paint and wire, and personalized with objects or images suspended from the branches or placed around its roots.
GRADES 6-8  Adjust as needed.
Materials (required):  Coiling Core-1/4" x 180 ft coil-share one across class/Coiling Core-1/2" x 100 ft coil-share two across class/ Aleene's Quick Dry Tacky Glue-4 oz -share three across class/All-Purpose Chipboard-30 ply-22" x 28"- share one sheet among 12 students/ Armature and Sculpture Wire-14 gauge- 350 ft spool-share one across class.
Optional Materials:  Economy Glass Bead Assortment-1 lb /  Copper Wire-24 gauge-100 ft spool/ Liquid Watercolor-assorted colors/ Crushed Pebbles-White/ Framed Up Jewelry Accents, assorted/anything else personal to the artist.
Preparation:
 1. Cut coiling core into 12" sections. Plan on five pieces of 1/2" and five pieces of 1/4" per tree (10 ft total). Coiling core may be cut with sturdy scissors or with a paper trimmer.
2. Cut 7" to 8" square bases from chipboard, scraps of cardboard, or matboard.

Process
1. Bend all coiling core lengths against the curve to straighten as much as possible.
2. Gather five pieces of small coiling core into a bundle. Stagger lengths. Bind with masking tape towards the bottom.Process, continued
3. Create the tree trunk. On a large  piece of coil, apply a line of glue  about 2" long below the center of the length, but not all the way to the end. See illustration (A). Position the coil with the glue side against the bundle of small coils and hold briefly until glue begins to grab. Repeat with remaining large coils, staggering their lengths as well, until they surround the bundle of small coils. Wrap with masking tape to secure while the glue dries. NOTE: The upper 9" of the coils will remain unglued and can be spread apart to begin positioning of branches.
4. Glue the short, loose ends of the paper coil bundle to the square base, pressing down and spreading them apart to form the roots of the tree. Apply masking tape to the roots to hold the tree upright on the base while the glue dries.
5. Bend and twist the long, loose ends of the paper coils to create tree branches. Loosen the ends of the coils and gently spread the paper to create leaf-like fullness on the end of each branch.
6. Insert wire sections into the trunk of the tree. The wire may be bent and curled to make more branches or vines. It may also be wrapped around individual branches to make them easier to bend, to hold them in place and to suspend objects from the branches. 
7. The Spirit Tree may be left white or painted.
Options — Glue pebbles, sand, or dried moss to the base to cover the chipboard. — Hang beads, charms, photos, or other objects from the branches with wire or string. Glue strands of cotton or wool to the branches to imitate moss.— An alternate lesson plan could focus on the Japanese art of bonsai.
 

Sculpture:Found Materials

Multiples Found Object Three-Dimensional Design Project Materials:
Five or more found objects
Glue
Scissors
tape
string
paper
cloth
wool
wire
anything to combine the objects.
 
Project description:
Students will combine multiples ( five or more) of like found objects to give them a new form. 
Students will bring together five (or more) like found objects and make one new from by combining these objects. 
Students will use techniques of binding, wrapping, coating, or other methods of joining the five+ objects to each other and to other materials in order to make the sculpture visually captivating.
 
Students can make the piece elegant, sublime, beautiful, surreal, or fantastic.
Notes: 
Texture and methods of construction are important to the over all appearance.
Objects must be structurally sound, must not fall apart.
Just about anything can be used as long as you don't pay for it.  Look around the house, junk yards, and nature.
Artist to look at:
Jackie Winsor, Lucas Samaras, Arman, Meret Oppenheim, Eva Hesse, Rauschenberg, Tom Friedman

Student Skills:
Students will explore aesthetic relationship between form and space.
Students will interpret form, space, mass, and shape.
Students will develop creative problem solving skills and artistic expression,
Students will develop conceptual and process-based problem solving skills, interpretive skills, and oral communication skills


Three Dimensional Overview Information:


Basic Vocabulary 
 
Postive Shape: a shape that has detail insides it, such as an outline of a human, with body features.

Negative shape: a shape with out any details, it just an outline.

Volume; the amount of space that a substance or object occupies, or that is enclosed within a container, especially when great.
Line: marks that span a distance between two points (or the path of a moving point). As an art element, line pertains to the use of various marks, outlines and implied lines in artwork and design. A line has a width, direction, and length. A line's width is sometimes called its "thickness". Lines are sometimes called "strokes", especially when referring to lines in digital artwork.

Contrast: the state of being strikingly different from something else, typically something in juxtaposition or close association.
Direction: a course along which someone or something moves.


Monday, March 14, 2016

Incorprating Aspects of Film Making Into Art classes

Film-Making And Art Classes

I would have to ask my students what they are interested in when it comes to film making.  I like to find out from my students what they are personally interested in.  Costume Design has come up in the past with some of my younger students.  Film as a media has a big impact on today's society and invades every aspect of our life's. I think it's important to be able to reading and understand media today.  Media literacy is more important now than it has ever been. 

 
A basic way to start teaching filmmaking would be though stop motion.  Starting with construction paper cut outs and a free app. have students create a story with a bigger meaning or theme.  Next assignment, a stop motion with a camera and toys. This would require editing, planning, scripting, music, and more.  The last assignment I would have students make an live commercial, try to sell something.  They would have to create a product or service and sell it.  Through these processes students would learn a lot about how films are made, in-depth planning process, media literacy, and technology used to produce media.

Paper Heart Stop Motion Video


My Little Pony Transformer Stop Motion

Special Needs and Gifted Students.

Special Needs and Gifted Students In Art Education

In Art, as well as academics,  I think that you may find that there are a lot of similarities to the approach to teaching both special needs students and gifted students. You will find that they also work very well together.  Gifted students will be challenged and gain a great amount of experience when paired with a special needs students.  Special needs students receive one on one help and build invaluable peer relationships.  Both gain a deeper understanding of others.  This can hold true for any students working with special needs students.

My personal options about specific lesson is keep the lessons the same for all the students, however you will need to modify aspects of the assignment on individual bases to suit the individuals needs. I take it as it comes.  What worked for one student doesn't always work for another.  Everyone can do it; it's just a matter of how we are going to get there. Techniques and tools may need to be modified for physical, emotional, or mental reason (this includes modifications  to challenge a student more).  

Please remember no matter what, all students want to be engaged and helpful!

Lesson For All Levels-Clay

Surrealism Clay sculpture
you can add-with at least two different elements combined to make one: one organic element and one manmade.

1.Show ppt. with examples


2.Show students how to put texture into clay using tools and hands.

3. Have students sketch some ideas.

4. Give each student clay to create a sculpture,

5. When dry paint with bright texture patterns.


Made by Students ages 8-18:


Monday, February 29, 2016

Digtal Media and Art


 Claymation stop motion

 
Description of Project:
 Students will create a stop motion video with clay in groups of four students.  Students will review such stories as Asphalt’s tales and analyze cartoons, stories, and books for the underlining message for ideas and inspiration. Students will write a short script that address moral, ethical, or behavior issue in today’s school (of their choice).  Students will then create a short storyboard on poster board.  Students will learn how clay into different form and move the clay for stop motion. Students will learn to take stop motion pictures.  Students will move clay characters and take digital pictures of each movement. They will then learn iMovie and use the program to edit and complete a short stop motion clay video.   Students will have learned the basic of stop motion animation, the basic techniques, programs, technology, ideas, time, and steps involved in completing a 1 to 2 minute video. 
Objectives:
By reviewing, interpreting, and analyzing such works as Asphalt’s tales, cartoons, stories, and books for the underlining message, , teaching a lesson, and inspiration students will learn to look beyond the surface of the media for true messages.  Students will learn to how to communicate ideas, which are important to them, though art and media.  Students will be able to manipulate clay and understand the concepts of stop motion production.  Students will also have an understanding of the media production process of videos from beginning to end.  Students will gain invaluable experience working in groups and making group decisions. 
Materials and Equipment:
·       Notebook paper
·       Poster board
·       Pencils
·       Erasers
·       Ruler
·       Clay
·       Scrapbook/Construction Paper
·       Scissors
·       Markers
·       Glue
·       iMovie
·       Computer
·       Camera
·       Tripod
Visual Examples:
 
Detailed Description of Procedures:
 Day 1:
·       Introduction to Claymation Stop-Motion Animation Project with examples of Claymation videos.
·       Review how stories can have messages.
·       Separate student into groups of 4.
·       Read, and analyze such stories as Asphalt’s tales, cartoons, stories, and books for the underlining message for ideas and inspiration. (ask students what cartoons they have seen with messages and what are they)
·       Brainstorm as a class some messages/ideas the students would like to tell stories about.
·       Groups will pick a theme for their story.
·       Groups will create a short story and script around their theme.
·       Groups will begin work on drawing out their storyboard.
Day 2:
·       Groups will finish creating their stories
·       Groups will finish their storyboards
Day 3
·       The teacher will give a demonstration on working with clay, using a camera, making the clay move, and taking one picture at a time for Claymation stop motion.
·       Student will practice a few movements and take pictures.
·       Students will make back grounds and start taking Claymation stop motion pictures for their film.
Day 4-5
·       Students will make back grounds and start taking Claymation stop motion pictures for their film.
Day 5-6
·       Teacher will demonstrate how to down load pictures to iMovie.
·       Teacher will demonstrate how to edit and create a stop motion video in iMovie
·       Students begin working on putting together their movies in iMovie
Day 7:
·       Students will show stop motion movies for feedback and make changes
Day 8:
·       Viewing day as a class.


Friday, February 26, 2016

Color Theory


Color Theory for young adults

Color Theory is a body of practical guidance to color mixing and the visual effects of a specific color combination.

                 
Color Theory Vocabulary:
Primary Colors: Red, Yellow, Blue
Secondary Colors Purple(a mixture of blue and red), Purple (a mixture of blue and red), and Orange (a mixture of yellow and red).

Tertiary/Intermediate Colors: made by combining a primary color with a related secondary color. or combining two secondary colors. Examples orange + green, purple & orange, red-violet, yellow-orange.
Complementary Colors: colors directly opposite each other in the color spectrum, such as red and green or blue and orange, that when combined in the right proportions, produce white light

 Cool/Warm ColorsWarm colors are often said to be hues from red through yellow, browns and tans included; cool colors are often said to be the hues from blue green through blue violet, most grays included.

Analogous: groups of three colors that are next to each other on the color wheel, which tends to be a primary or secondary color, and a tertiary. Red, orange, and red-violet are examples.
Triadic: color scheme uses colors that are evenly spaced around the color wheel.
Split Complementary: scheme is a variation of the complementary color scheme. In addition to the base color, it uses the two colors adjacent to its complement.
Triadac
Split Complementary


Tint/ Shades: tint is mixture of a color with white, which increases lightness, and a shade is the mixture of a color with black, which reduces lightness
Red Monochromatic Scale


 Achromatic: used as a synonym for “black and white.” A black and white print has shades of grey, but greyscale is also considered to be achromatic because it lacks hue, which means it cannot be classified as a subset of the colors red, green, blue (RGB) or yellow.
 Monochromatic: all the colors(tints, tones, and shades) of a single hue
Polychromatic: means having several colors. It is used to describe light that exhibits more than one color, which also means that it contains radiation of more than one wavelength. The study of polychromatic is particularly useful in the production of diffraction gratings.

Color Theory Painting Practice:

1) Describe and show examples of all the different color theory to students.
-Talk about the different  the categories and ask student name some of the color combinations and call out some colors.
-Ask students what color theories they are.
-You can give each student a box of crayons and have them place the right colors in a matching color theory trays and have group completions.
***Important: Make sure students have a firm understanding of them and clear up any confusion now, before moving on to mixing the color combinations.

2) Demonstrate basic painting application and proper color mixing techniques (for Tempera paints).
3)Start color schemes, color mixing and painting application out on the color wheel. 
Color wheel worksheet

***Handing out a "full color" Color Wheel to each student first, is a great help.
-Next demonstration how to create your own color wheel. 
-Have students create their own color wheel or paint  a premade one in, mixing all their own colors.
Color Wheel


4)Next go back over the color theory definitions again.
-Then demonstrate one or two blocks of each color chart you have chose for your students to learn in color theory 
-You can find charts on line, make your own, or have you students make their own.

Example 1
Example 2
McBride 1997
                                                
 The Color Theory Project
 
Drawing enlargement:
1)Photograph each student
-Change photo to black and white image
-Apply Filter,
       Photoshop>Filter Gallery>Cutouts or
       Photoshop>Image>Adjustments>posterize
-Print 11X 8 black


2)Draw 1inch blocks over picture.
*****Measure Twice Draw once!!!!!


3) Draw 2inch Blocks on Paper
 ****Measure Twice Draw Once !!!!


4)Transfer the picture using the grid as a guide. Match each block on the  1 inch picture with the same block on the 2inch paper and draw the small lines in that block on the paper.  


Transferring picture using grid system


 5)  Pick a color scheme/theory.
-Make sure to discuss the idea/ concept with the student first to see if they full understand what they are about to doing before they start painting.

6) Start Painting.


 7) An alternative:
- is to find a magazine or photo and start at step 2
divide the picture into Radom section when it comes time to paint and do each section in different color scheme.
-Photo copy the picture or photo into black and white
-skip the grid and free hand the image.

Below: Draw from a photography, freehand (no grid), Sectioned into a Radom design and done in  Monochromatic and Complimentary Colors
J.McBride,     Wild Rose,        1998